
1 / Natural Bundle Dyeing
- studioFADEN

- Jun 25, 2020
- 5 min read


WHAT YOU WILL LEARN
To create unique splatter patterns on silk using bundle dye technique and natural easy to find dye-stuff
WHAT IS UNIQUE TO THIS METHOD
This method uses only silk fabric, plant dyes, water, and vinegar. The vinegar helps the silk accept the plant dyes and acts to make the color more vibrant. This method will not work on plant based fiber fabrics such as cotton or linen.

WHAT YOU WILL NEED
MATERIALS: (you will need all of these things)
Silk to dye. I've used blank Habotai Silk scarves I bought from Dharma Trading Co. You can use any 100% silk fabric or finished item (clothing, home goods, etc)
Vinegar
Spray bottle
Water
Bowl or bucket large enough to soak your silks
Gloves (Even though these are natural and generally safe materials, some people can have irritations, specifically in handling eucalyptus. Also we want to protect our hands from being dyed or transferring dye stuff to a different design. Always wash gloves in between projects.)
Waterproof cover for table. You can use plastic sheeting, a table cloth or trash bag
Cotton or flax twine, kitchen twine works great
Either one of these: (both methods work as I will elaborate later)
Pot with lid and steam tray large enough for your bundle - OR -
An air -tight container large enough for your bundle, i.e. a large bell jar or other reusable container
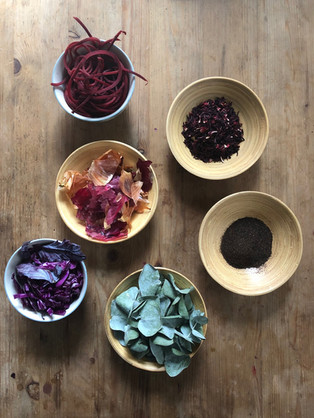
DYE STUFF: (you can chose which of these you'd like to use - also this is not an exhaustive list, there are many many more plant based dyes)
Turmeric (ground) - Vibrant yellow to deep gold
Hibiscus flowers (dried) - Vibrant purple
Black tea - Light orangey brown to tan browns
Red onion skins (only the outer dry skins, not the fleshy onion parts) - Soft berry purples and pinks
Yellow onion skins (only the outer dry skins, not the fleshy onion parts) - Soft golds and yellows
Beets (fresh cut into spirals) - Soft red (on the orangery side)
Red cabbage (fresh chopped) - Bright purple with watercolor effects
Eucalyptus leaves (fresh de-stemmed) - Yellowish pale green
Pro Tip: I save my onion skins from cooking in a brown paper bag in a dry spot in my pantry so they're ready to use when its time to dye.

PREPARE
Put on gloves
Create a soak bath in your bowl/bucket: mix 1 part vinegar to 4 parts water (i.e. 1 cup vinegar & 5 cups water)
Add your silks to your soak bath and let sit for at least 15 minutes
Fill your spray bottle with vinegar only
Lay out your table covering, you will need enough table or floor space for the entire silk to lay flat
Ready dye stuff and place in an accessible location

MAKE
Remove your silks and gently squeeze out excess bath liquid
Lay out your silk flat on top of your table covering
Carefully place or sprinkle your chosen dyes across the silk (see recipes and suggestions below)
Once you are finished with your design, roll up your silk fabric and fold into a bundle (this size will depend on your silk fabric size, but you will need this to fit into your steam pot or air-tight container)
Wrap the bundle tightly with twine to keep it all together
Spray the whole bundle with the vinegar from your spray bottle
Pro tip: How you roll and fold will effect your pattern. Think about how the dye stuff will bleed through the silk. For example, if you're looking for stripes: layout the dye stuff in a line and roll up parallel to your stripes.

SET THE COLOR
Chose one of the below options for how to set your dye. They both work! Steam setting is fast and effective, but slow sun setting allows for you to watch the process and is great if you do not have stove access. OPTION 1: STEAM SET
Place your steam tray into your pot and fill with water up to the tray but not more
Place your bundle on to the steam tray. If you are steaming multiple bundles at the same time, note that the color may transfer if they are touching.
Cover the pot and place on high heat to bring to a boil
Reduce heat to a simmer and check on water levels
Steam for 1 hour, checking on water level and bundle every 15 minutes. IMPORTANT: If you will need to add more water, remove from heat then slowly and carefully add water, but do not get your bundle wet in the process. Also your bundle can burn, so make sure you have enough water for continuous steam and that there is no sign of damage to your silk.
Use tongs or utensils to remove from pot and place on rack or heat-safe surface to cool
OPTION 2: SLOW SUN SET
Place your bundle into your air-tight container and seal it shut. Make sure its sealed, access to air will lead to unwanted mold.
Place the container in a windowsill with access to sunshine
Let it sit for at least 1 week (longer will allow for more dye to spread to fabric, but always check in on it to make sure there is no mold)

UNVEIL
Once you've set your dye, its time to unbundle to reveal your work!
Cut or untie the twine and unwrap your bundle. All used dye stuff can be composted
Rinse your silk with warm water to remove any excess dye stuff
Wash your silk with dish soap or another very mild soap and rinse clean
Squeeze to remove any excess water and hang to dry
Pro tip: Once dry, silk can be ironed on low heat. Always safest to place muslin or light cotton between the heat and silk to protect your work while ironing.

EXPLORATION / projects


Square Scarf /1 MATERIALS:
35" x 35" Silk Scarf
2 tbsp. Turmeric (ground)
1/4 med. sized Red cabbage (fresh, chopped)
Turmeric creates great all-over color in vibrant yellow tones. Sprinkle lightly, with turmeric a little goes a long way. After sprinkling turmeric all over, I added red cabbage randomly across the scarf. Red cabbage creates a beautiful watercolor effect of purple shades.
To bundle, I rolled from one corner to the other, then folded in half. This scarf was steam set for 1.5 hours.
Note: I believe 1.5 hours was the limit for this scarf, I noticed the turmeric start to bake and reveal flecks of dark gold, almost to the point of burning, which can cause holes in your fabric.


Long Scarf /1 MATERIALS:
8" x 54" Silk Scarf
1 cup Hibiscus flowers (dried)
1 large Beet (fresh, spiral cut)
1 stem of Eucalyptus leaves (de-stemmed)
I started with making rows of hibiscus, spaced evenly along the scarf. Hibiscus creates the bold purple markings ranging from deep to faint.
Then I added eucalyptus, crunching them in my hands and sprinkling all over.
Finally, I laid out the beets in the spaces that were missing dye stuff.
To bundle, I rolled up this scarf from one short end to the other.
This scarf was steam set for 1 hour.


Square Scarf /2 MATERIALS:
35" x 35" Silk Scarf
2 tbsps Black tea
1 cup Yellow and red onion skins
1 med. sized beet (fresh, spiral cut)
Black tea also creates great all-over color, here seen in a golden orange. Its inherent texture also creates a freckled appearance. I sprinkled it all over the base.
Next, I crushed onion skins, both yellow and red together, and tossed them across at random. You can see the red onion skins in fuchsia spots. The yellow seem to have vanished within the overbearing tea dye, rendering them unnecessary here.
Finally, I added beets across the alternating areas, which are very subtle here, shown as very pale red hits amongst the golden tea.
To bundle, this scarf was rolled from each side to the center, then together and in half.
This scarf was slow sun set for 8 days.
Have fun and feel free to share your results and tag us #studiofaden Follow us @studio_faden for more tutorial announcements!
This tutorial 1 / Natural Bundle Dyeing has been created by Studio FADEN and is not for redistribution or profit. If you'd like a personal or group workshop, please email me.
Comments